Designer, illustrator and Brave the Woods co-founder Brad Woodard recently harnessed the power of the Woodland Wonderland Brush Set, and a slew of RetroSupply filters, to create a stunning four-color screenprinted poster for a new venture celebrating America’s 59 national parks, the Fifty-Nine Parks Print Series.
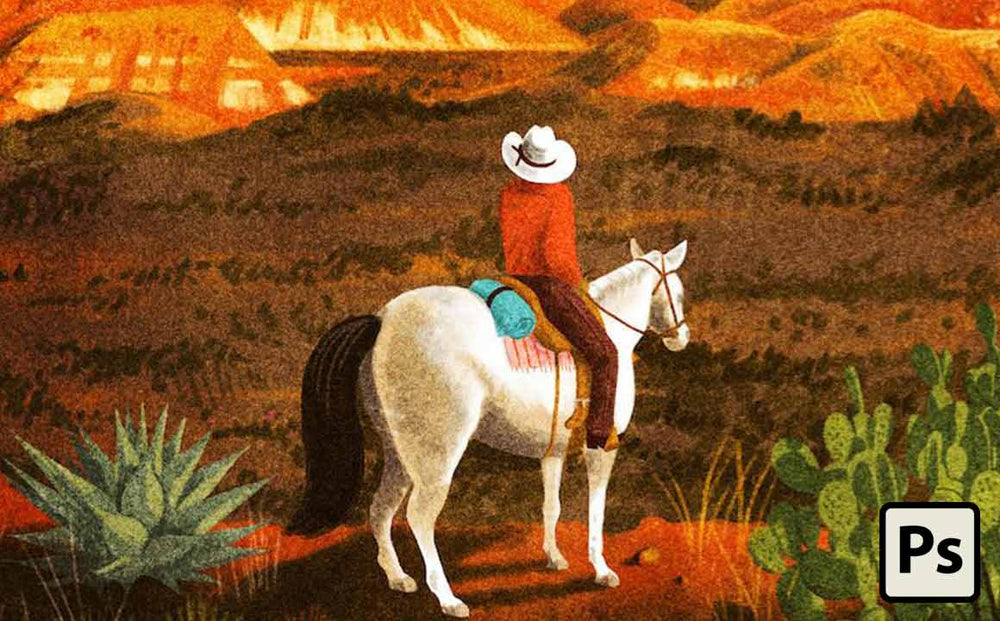
Best known for his vibrant, stripped-back vector art, Brad ventured into new creative territory for his poster of Texas-based park Big Bend.

He used the Woodland Wonderland Brush Set – 31 Photoshop brushes inspired by vintage Golden Book-style artwork, which he collaborated with us to create – to experiment with a painterly aesthetic in Photoshop.
“Each park is visually represented by different artists,” explains Brad, who had just completed a five-week road trip around the US, visiting national and state parks, when he was invited to contribute to the project. “The timing couldn’t have been any better.”
We caught up with Brad to find out how he created his poster...
How to create a heavily textured retro illustration in Photoshop
Creating a poster using new techniques wasn’t easy. “The most challenging part of the project was the entire style,” laughs Brad. “It was a huge stretch for me to go more realistic and painterly, but it was a fun challenge, and really brought me back to my analog oil and acrylic painting days.”
“The only way I was able to pull it off was by leaning heavily on my past experience painting on canvas, and figuring out how to blend paints to create texture and value.”
Over the following three steps, Brad highlights the key stages involved in creating his Big Bend poster, sharing some pro tips for creating a heavily textured retro illustration in Photoshop with the Woodland Wonderland brush set.
01. Create a smooth painting

Brad Woodard: I painted the poster using the Woodland Wonderland gouache brushes, slowly building up color, allowing the slight transparency of the brush to make smooth value changes.
The trick to working with the gouache tool presets in that set is to lightly press on your stylus if you want to make the color on the brush more transparent. That helped when I was trying to work with shadows and color gradations in the mountains, for example.
02. Add texture by layering color

One way to create a feeling of randomness and texture using the Woodland Wonderland brushes is to layer on colors. Create the main shape with a solid color, and then use the color picker and slightly adjust the color, making it lighter or darker.
Sometimes I even mix in a bit of a random color to make it stand out a bit more. Then lightly press on your tablet and fill in random areas of that shape. When you zoom out, it’ll look like you have more detail and life to the shape.
03. Build up heavy texture

A lot of the imperfections and details you see in this poster where achieved by overlaying a scratched up film plate layer, adding some grain, and playing with the contrast and vibrancy levels found in the Adjustments panel in Photoshop. (Image: above, left). But underneath all that is a smooth digital painting (Image: above, right).
Pro tip: Create your heavy texture layer early
If you’re planning on using a heavy texture or filter over your final digital painting, it’s smart to create that layer near the beginning of the project, and toggle it on and off while painting.
The old film plate layer I used created random value changes throughout the composition, so it was nice to see where those were so I could adjust the value of the colors in the painting. And it just made it easy to see what my finished result would look like all along the way, instead of running into issues trying to make it work in the end.
“The biggest lesson I learned during this project was that it pays to use quality products when working on a big project,” says Brad.
“Having professional quality brushes and textures to use in the creation of this poster saved me time and helped up the professionalism of my art. If I had cheap, pixelated brushes that didn’t behave like real paint brushes,” he continues, “it would have been a much less enjoyable project.”
Buy the Woodland Wonderland brush and tutorial pack now

The Woodland Wonderland Brush and Tutorial Pack includes 31 unique brushes inspired by Golden Book-style artwork, including gouache, pens, pencils and conté, plus a number of unconventional brushes like Wax Rollers and texture brushes.
The premium edition ($29) comes with four video tutorials from Brad Woodard of Brave the Woods, an insightful cover illustration PSD and time-lapse, a Woodland brush quick reference, easy installation instructions and free updates for life.
Alternatively, you can pick up a basic version of the Woodland Wonderland Brush & Tutorial Pack for $19, or the deluxe version for $47 – full details here.
Have you used our Woodland Wonderland brushes? Let us know in the comments below, or tweet us a link to your work – we love to see what you're doing.