How to Draw an Authentic Comic Panel

How to Draw an Authentic Comic Panel

Vintage comic books hold a special place in the hearts of most illustrators. There's something captivating about the classic look of comics from the 20th century that resonates with readers to this day.

But for many aspiring artists, creating a vintage-looking comic panel can seem like a mystery shrouded in complexity.

Fear not, the secrets to unlocking this riddle are closer than you think!

In this blog post, we'll unravel the mysteries behind achieving a vintage aesthetic in your comic-inspired artwork.

With these techniques, even the most uninitiated can create a classic comic panel that will leave even the most discerning comic book aficionado awestruck. Ready? Let's journey into the realm of the vintage-looking comic panel.

Materials

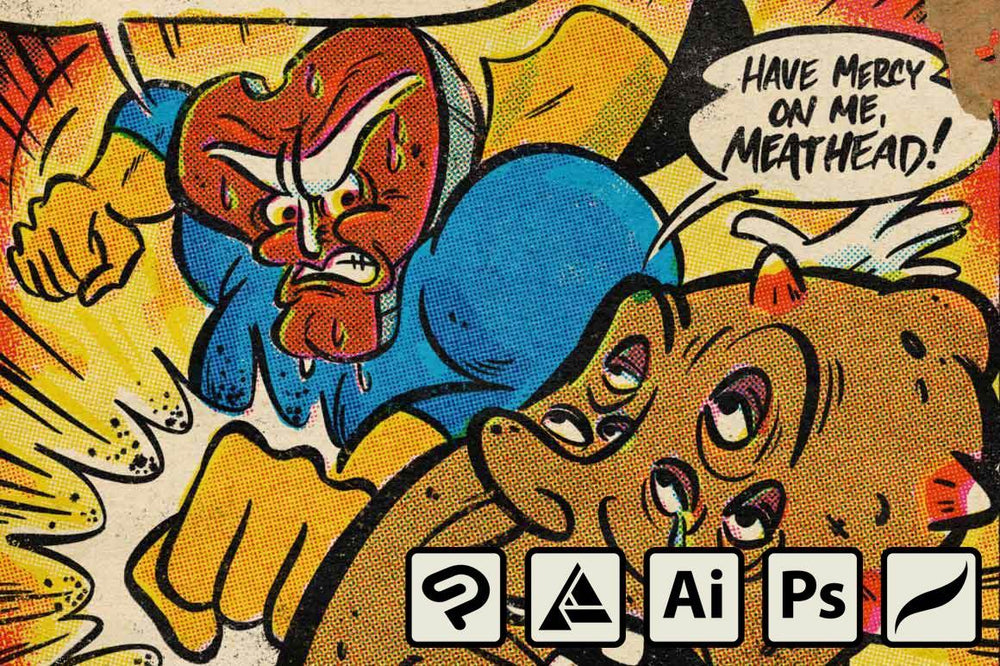
While many of the tools and materials listed in our guide can be replaced or omitted, there's one item that's essential for achieving the classic four-color offset printing effect: ColorLab.

Unlike other tools that can be substituted or removed, ColorLab is the key to creating halftones and emulating the look of real analog printing methods. Without ColorLab, you won't be able to achieve the same level of authenticity and professional-quality results.


ColorLab

Capture the lo-fi look of classic comic inking in your digital art — just like you see in vintage comic books, Sunday comics, and old school advertisements!

Step 1: Sketch Your Illustration

Sketched comic panel with blue and red pencil

Sketch your illustration in your favorite program (we're partial to Procreate, Photoshop, and Clip Studio Paint) using a red and blue pencil.

Discover the secrets of sketching like a comic book artist here.

Setting your pencils to red and blue can be helpful because these colors are easily distinguishable from black ink, allowing you to more easily differentiate between your sketch and the final linework.

Try the default pencil tools in your digital art program or use the Standard Pencil Pack from RetroSupply Co. They offer an authentic feel to your digital sketches. This step is optional, but it can help you create a stronger final product.

Step 2: Ink Your Linework

Inked comic panel with blue and red pencil underneath

When you ink your linework you'll have the benefit of seeing your original sketch in blue and red pencil beneath the ink lines. This can help you see the difference between your initial concept and your final linework.

Get tons of tips on inking your work in this live draw recording.

Use thicker ink lines for the outlines of characters and thinner lines for details. RetroSupply offers some popular Standard Ink Pens that can be used for inking. Keep in mind that ink coverage in old comics was done by hand and hand inconsistencies, so aim to reflect that in your linework for a more genuine vintage feel.

Step 3: Choose Old Paper

Comic panel with paper texture

Import an old paper scan from ColorLab, and place it at the bottom layer. This paper will be the foundation of your retro comic book. You don't need to do anything to this layer; it already looks old and yellowed.

ColorLab offers high-quality paper textures that work great as the foundation for your retro comic book panel.

Avoid downloading free paper textures from the internet unless you're really confident in the source. Free textures are often low qualityand have digital artifacts. Prebuilt paper textures like the ones included with ColorLab are built in layers to create the illusion of real ink on paper.

Step 4: Add Color Halftones

Comic panel with yellow halftones
Comic panel with four-color process halftone and textures

Add a layer of color halftones on top of the old paper layer. The easiest way to do this is with our ColorLab color halftones pack.

Check out each image in the slider above, you can see the changes in the image as each color is added.

Once you have your halftones, set the layer to "multiply" or "darken" mode to achieve the faded and aged look commonly seen in vintage comics.

Step 5: Add Wear and Tear

Complete illustration of comic panel with ink, colors, and textures.

To complete the vintage look of your comic panel, you'll want to add some wear and tear.

Using the layer mask function available in most design software, create mask layers over your linework and color work.

The Edge & Fold Distressor Brush Pack can add texture, while a Quick Mask allows you to paint on reversible wear and tear to create the appearance that your comic has been around for years. This final step will bring your vintage comic panel to life and give it the authentic look you're after.

We also used the Office Supplies drag-and-drop clip art pack to add the old staples and tape, which helped add to the vintage feel.

Final Thoughts: Creating a Comic Panel

That's it! You have now created your own vintage-style comic. Take some time to compare your work with scans of archived vintage comics and analyze what you've made. Experiment with different combinations of wear and tear until you're happy with the result.