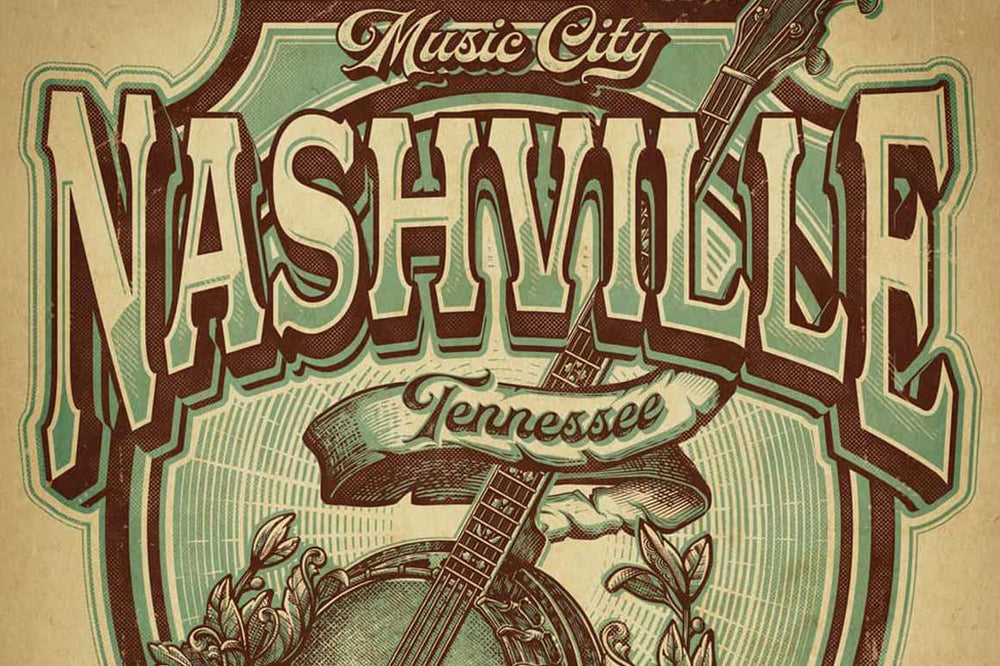
In this tutorial, I will go through some of the steps I used to create a vintage style poster illustration. I have worked for numerous apparel and entertainment companies over the years, and the steps below will show some of tricks I have picked up along the way. For this poster, the theme will be Nashville, the Home of Country Music.
After an initial sketch, I will begin the design in Illustrator before importing the design into Photoshop to add some additional grunge, texture, and detail.
This design will incorporate several of RetroSupply’s products, including:
- Deep Cuts Engraving Brushes
- DupliTone
- Edge & Fold Distressor Brushes
- Motor City from the Carmel Type Font Bundle
01. Sketch the design concept
I begin by drawing a sketch of my idea for the design. I use a Wacom Cintiq, and I draw out the sketch in Photoshop.
At this point, I don’t know what fonts I want to use, but I typically try and strive to keep most of my poster and apparel designs to two font families or less. In this case, I’m thinking a bold font for Nashville will work, and a script font for the secondary text will be a nice compliment.
The sketch can be pretty loose, all I’m looking for here is a good idea of the framework for the design.
02. Drawing out the design in Illustrator
After the sketch, I begin drawing out the design in Adobe Illustrator.
Next I choose some colors that I think will give the design a vintage feel (a brown and teal combo), and start making some shapes based on the original concept of the sketch.
Once I get the colors I like, I add them to the Swatches palette by dragging and dropping the color. I then double-click the color in the Swathes palette to bring up the Swatch Options dialogue box, and select Global. When Global Colors are adjusted, it updates any object in my design that is using that color (fills and strokes) instead of having to select and change them individually.
At this point, most of the shapes are kept as strokes (as shown by the wireframe) so that if I want to adjust the thickness of any of the lines, it’ll be easy to do.
03. Adding some background details
I want to add some shapes to the background in the oval area of the design, with some rays emanating from the center. I don’t want the strokes to look too smooth though, so here is where the Grave Etcher brushes come in handy.
First, I’ll draw out a couple of concentric circles (3A), and then I’ll create a blend between the circles (Object > Blend > Make and then Object > Blend > Blend Options to adjust the number of steps), shown in image 3B.
Then I expand the blended circles (Object > Blend > Expand). At this point, I have 5 concentric circles, and now I will apply a few brushes from the Deep Cuts pack (3C) to start to give some variation to the circles (and also vary a few of the stroke widths).
Next, I will apply another blend (with 6 steps between) to create a bunch of concentric circles with varying widths and irregular edges that the Deep Cuts brushes provide (image 3D).
04. Finishing the background shapes
Next I draw some lines out from the center with the Line Segment tool, once again using a few brushes from the Deep Cuts brush pack; the Etch Single Extra Short 09 brush works perfectly to roughen it up a bit.
Finally, I bring the whole group over to my initial layout and scale it disproportionately to fit into the oval area of the design. Now I have the basis for my design in which I will incorporate the other elements into.
05. Added text and text effects
Next I add in the text. I use Motor City from RetroSupply’s Carmel Type Font Bundle for the main ‘Nashville’ text. I key in the text and then outline the text by using Type > Create Outlines.
I want the text to have a curved arc along the bottom of the letters, and in most cases Effect > Warp > Arc Lower would do the trick.
However, in some instances the letters can get warped and not be perfectly horizontal across the top. A better option in this case is to make a duplicate of the lettering (I also remove the fill color), then flip it horizontally with the Reflect tool, line up the edges and group both objects and then use Effect > Warp > Bulge. This enables the top edges to remain straight across. I can then expand the effect with Object > Expand Appearance and delete the upper text. Now my text is ready for additional coloring and drop shadows.
06. Drawing the floral elements
After finishing up the text effects, I move onto the floral elements. First, I’ll draw out some basic floral designs, using the Pen Tool, Blob Brush, and Pencil Tool.
I try to re-use shapes whenever I can so I’m not starting from scratch with every shape; sometimes I’ll take one element, and flip/skew/rotate it etc., and then I will redraw a few parts with the Pencil Tool to give further variance. This way I can quickly build up fairly complex designs pretty quickly that don’t feel too repetitive.
07. Creating custom brushes
I’m going to need some brushes to add some detailing in the floral shapes, so I draw out the shape of the brush with the Pen Tool (as shown above in Wireframe view), then drag the shape onto the Brushes Palette and select Art Brush from the New Brush dialogue box.
In the Art Brush Options dialogue box I select Tints from the Colorization menu, which will make it easier to adjust colors. With these custom brushes, I’ll be able to quickly add strokes that will have some nice tapering to them.
08. Adding detail with Custom Brushes
Now that I’ve got some brushes made, I add details into the floral shapes with the brushes using Pencil tool. I again use Blend to quickly make additional shapes (Object > Blend > Make), shown here in a couple of the pink strokes.
In a few places, the strokes go outside of the main shape so in those instances I use a mask. Select the shape you want to use as a mask, copy and then past it in front of the shapes you want to clip and select them, and then use Object > Clipping Mask> Make.
09. Finishing the floral shapes with Pattern Brushes
Next I add more detail with Pattern Brushes to create sort of a mandala style look to the florals. Creating Pattern Brushes is a bit more involved than creating Art Brushes, but the main difference is that Art Brushes stretch a graphic along the length of a path, and Pattern Brushes repeats the art along the path.
I continue on with the design of the banjo and banner using similar methods.
10. Importing the vector artwork into Photoshop
Once the banjo and banner elements are completed, I prepare the artwork in order to import it into Photoshop for some finishing touches. I select the entire design and copy it to a new layer. There, I make sure all text and strokes are outlined, and then use Merge in the Pathfinder palette to combine all of the same-colored shapes together. Then I can select them individually and paste them into Photoshop.
11. Adding detail with the Deep Cuts and DupliTone
With the color shapes imported into Photoshop, I add in more detail with the Deep Cuts and DupliTone brush packs.
First I create teal and brown Fill Colors layers. I then fill each mask with black to hide the color. Then I can paint into the mask of each layer to reveal the color of the layer. The Deep Cuts RSCO 3 Line Engraver 02 brush, among others, does the trick, as well as a rough halftone brush from the DulpiTone brush pack.
It’s important to note here that I use a Wacom Cintiq with a pressure sensitive stylus pen; having pressure sensitivity is essential in this case to maximize the full potential of these brushes by having some of the engraving lines broken up (using light pressure) as well as more solid lines (using heavier pressure).
To round out the design and give it a bit more grunge/texture, I select all of the layers and make a layer group, and then paint inside of the group’s layer mask with some halftone brushes from the DupliTone pack.
Additionally, I use the Edge & Fold Distressor brushes for even more distressing. To complete the design, I add a vintage paper texture and bit of vignetting with a Curves Adjustment layer to darken the edges.
CONCLUSION
In this tutorial, I have gone through some of the main steps I use in creating poster and apparel designs. Using design tools from RetroSupply (including Deep Cuts Engraving Brushes, DupliTone, Edge & Fold Distressor Brushes and Moter City from the Carmel Type Font Bundle) helps to streamline my design process while saving time to create results that wouldn’t be possible with standard brushes.
About Joel Jensen
Joel Jensen is an illustrator, graphic artist, and photographer based in Eagan, MN, known for his deep passion for art and continuous desire to grow as an artist. His interests extend beyond art, embracing sports and photography. Joel is open to freelance opportunities, assessing each project for its fit and his availability. Check out more of Joel's work here and be sure to follow him on Instagram for more inspiring art.
Articles & Tutorials
Customer Showcase: Deep Cuts engraving Brushes
Have you been thinking about grabbing our Deep Cuts engraving brushes? See examples of the pack in action in real customer artwork.
The Dos and Don'ts of Composition
Learn the secrets of effective design with this comprehensive guide on composition fundamentals.
Wolf Wax Live Draw Featuring Robin Banks
Watch a classic comic-style illustration being created during our one of our popular live draw sessions. Includes free brushes to follow along!